Mail Scheduling in Gmail
Hello "Learners"
Here I'm again with n new tips and tricks of the gmail which will help you a lot for the using of the Gmail service of your day to day life.
By Using, this feature user can schedule their mail and it will be delivered to recipient at the scheduled time and because of this feature user can easily do their work efficiently.
Steps are followed below:
Step 1: Login to Gmail and go and compose a mail.
Step 2: Click on the Right(Down arrow) to Send Button. There is an option of the Schedule send display.
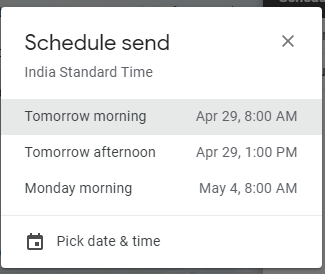
Step 3: Now, After clicking on the Schedule send there is an option displayed for scheduling mail.
Step 4: when you click on Pick date & time option will be Details of scheduling a mail.
Step 5: Click on the Schedule send mail will be scheduled and it will give you the notification for the scheduling time.
Now the steps are over and mail is scheduled successfully.
Here I'm again with n new tips and tricks of the gmail which will help you a lot for the using of the Gmail service of your day to day life.
Mail Scheduling features is very useful for the gmail user and here I will show you how to use this feature in your gmail to improve your gmail experience.
Mail Scheduling in Gmail
Gmail has a lots of feature for its user and they are adding it day by day to enhance their users experience on their services and so there is a mail scheduling is providing by the Gmail.By Using, this feature user can schedule their mail and it will be delivered to recipient at the scheduled time and because of this feature user can easily do their work efficiently.
Steps are followed below:
Step 1: Login to Gmail and go and compose a mail.
 |
| Fig. 1 Compose a mail |
Step 2: Click on the Right(Down arrow) to Send Button. There is an option of the Schedule send display.
 |
| Fig. 2 Schedule Mail |
Step 3: Now, After clicking on the Schedule send there is an option displayed for scheduling mail.
 |
| Fig. 3 Option for Schedule Send |
Step 4: when you click on Pick date & time option will be Details of scheduling a mail.
 |
| Fig. 4 Detail Schedule Send |
Step 5: Click on the Schedule send mail will be scheduled and it will give you the notification for the scheduling time.
| Fig. 5 Notification for Schedule |
Now the steps are over and mail is scheduled successfully.


Nice
ReplyDelete